Create Chainhooks
With chainhooks, you can automatically trigger an action in response to on-chain events on Stacks, Bitcoin, and other Bitcoin layers, enabling you to use IFTT (if_this, then_that) logic to power your applications. To learn more about Chainhook, refer to Chainhook overview documentation.
This guide helps you create a chainhook using the Hiro Platform.
Login to the Hiro Platform and create or import a project by following this guide. Next, you can follow the steps below to create a chainhook.
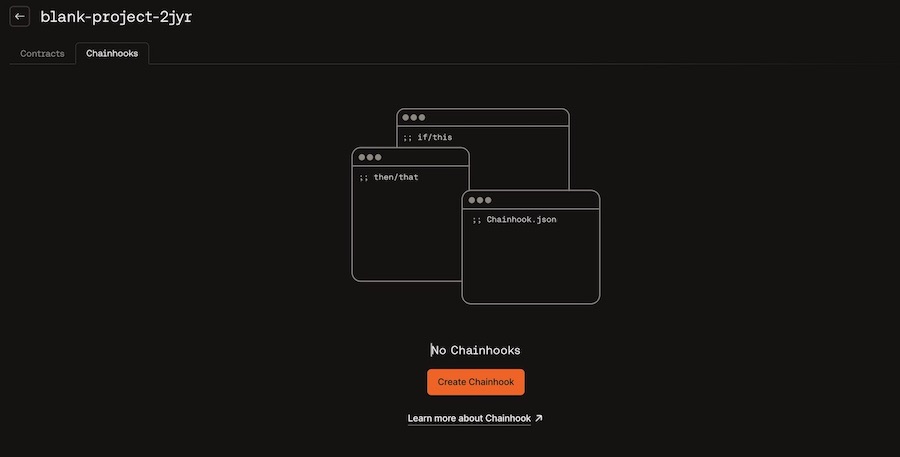
Once you are on the Projects page, select the project to create a chainhook.

You'll see a navigation bar with two tabs, Contracts, and Chainhooks. Select Chainhooks to create a new chainhook.

Select the Create chainhook button at the bottom of the screen.

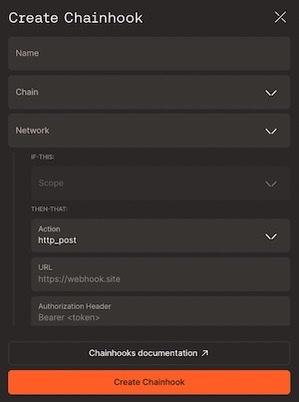
A new pane opens up on the right to create a chainhook. Use the following fields to create a chainhook:
Name: Define a chainhook name of your choice.
Chain: Select between Bitcoin and Stacks to create a chainhook.
Network: Choose a network between mainnet and testnet to observe for events.
If-this: Based on the selected chain, you will see a list of available scopes for the If-this condition.
For Bitcoin, the available predicate options are
txid,outputs,stacks_protocols.For Stacks, the available predicate options are
txid,block_height,fungible_token_event,non-fungible_token_event,stx_event,print_event,contract_deployment.
Note
Refer to the Bitcoin predicates and Stacks predicates documents to understand the available predicates and how to use them.
Then-that: This action is defaulted to http_post to allow the chainhook to post events to the URL specified in the below option.
URL: Specify a URL to post chainhook events to the HTTP_post method.
Authorization Header: This field is optional to add a Secret to the authorization header when posting payloads.
Start Block: This field must specify the start block to search the chain.
End Block: It is optional to specify the end block. However, to optimize your scan time, it is recommended to specify this field.
Expire After Occurrence: You can specify a number greater than or equal to 1 to expire the chainhook after a specific number of occurrences. You can leave this blank if you don't want to set any limit.
Decode Clarity Values: This is enabled by default for stacks predicates to help you decode clarity values in your contract.
Once you define the fields, you can select Create Chainhook.
The right pane navigates to the Projects page with the Chainhooks tab open, and you can view the chainhook created.

The NAME, CHAIN, LAST UPDATED, START BLOCK, TESTNET, and MAINNET headers are updated based on the selected fields used to create a chainhook.
Based on the chosen network, the respective status columns in the Chainhook list page will be updated to Deployed.
Note that there may be other fields in the UI to create a chainhook based on the predicates defined.
Edit Chainhook
Once the chainhook is created, you can edit the chainhook by using the ellipse on the created chainhook row.

You can update the fields and select Update chainhook.
Duplicate Chainhook
Use the ellipse on the chainhook row to duplicate the chainhook created earlier.
This opens a right pane with all the fields populated to use to create a duplicate chainhook.
You can update the fields or directly select Create chainhook to duplicate a copy of the chainhook.

Delete Chainhook
Use the ellipse on the chainhook row to delete the chainhook. You will see a confirmation window to confirm if you want to delete the chainhook.
